Camera-based PPE monitoring: what it can and cannot tell you
A camera can check whether personal protective equipment (PPE) appears to be worn where you require it. This guide explains what it sees well, where it falls short and how to use the results fairly.
A safety officer cannot watch each workstation through a whole shift. A camera can keep watching, but it reports only what is visible in its picture.
What the camera checks
PPE analytics typically look for the people in the picture. For each person they judge whether an item is present where it belongs.
- Hard hats. A large, rigid shape on top of the head, often in a colour that stands out. Typically the easiest item to check.
- High-visibility vests. A broad area of bright colour on the torso, front and back.
- Gloves. Small, moving and often hidden by the work in the hands.
- Masks. Small, and visible only when the face is turned towards the camera.
Each result is an estimate, usually with a confidence score, tied to a camera and a time. It says that an item appears to be missing. It does not say why.
- Easier to see
- Large items on a person who is near, upright and facing the camera
- Harder to see
- Gloves and masks, distant figures, poor light
- Camera positions
- Entry points and fixed work areas
Why small items are harder
The less of the picture an item fills, the less there is to judge it by.
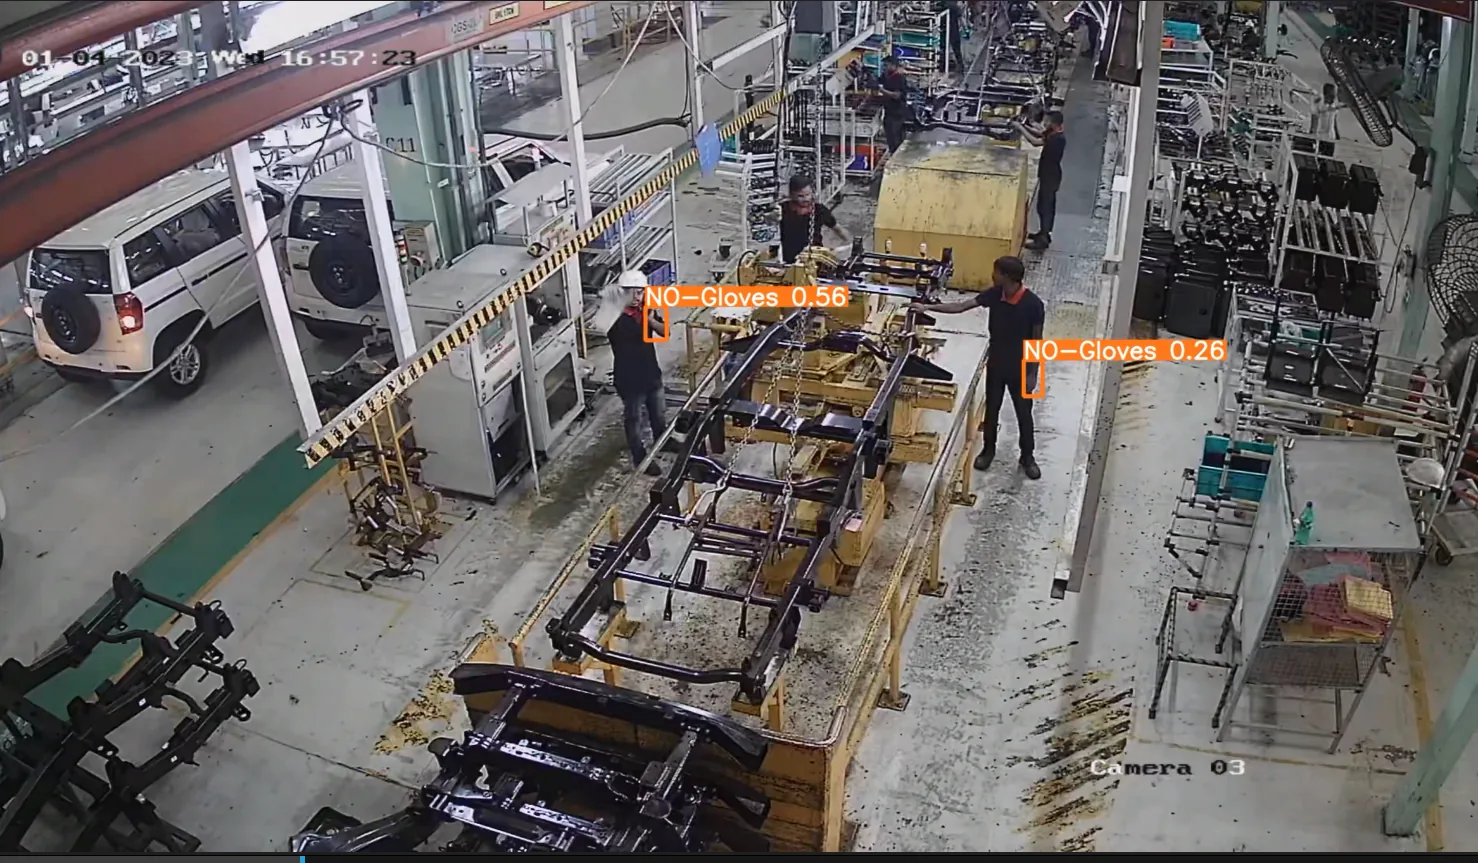
A hand is a small part of the picture
This overhead view takes in several workers at once. Each person fills a small part of the frame, and a hand far less. The two orange boxes at the workers' hands show how small an area a glove check must judge.
Gloves add problems that hard hats do not. They can be close in colour to skin, a sleeve or the part being held, and hands turn away from the camera.
Treat a single glove or mask result with more caution than a hard-hat result.
Where the picture falls short
Wrong results often trace back to the picture itself. The table lists the common causes and what typically helps.
| Limit | What happens in the picture | What helps |
|---|---|---|
| Blocked view | A machine, a load or another person hides the head, the torso or the hands. The item cannot be judged either way. | A higher camera or a second view |
| Distance | The person is small in the frame. A hard hat shrinks to a few pixels and a glove cannot be made out. | A camera nearer the work, or a lens with a narrower view |
| Lighting | Light from an open door behind a person leaves a silhouette. Low light and glare wash out colour. | Even lighting, and a view that does not face doors or windows |
| Similar colours | A cap can pass for a hard hat, and a bright shirt for a vest. | PPE in a contrasting colour, or a model trained on the site's own items |
| Camera angle | From straight overhead, the top of a hard hat shows but a vest is largely hidden and a mask cannot be seen. From a low camera, people block each other. | A raised camera that looks down at a slant |
What a camera cannot judge
A camera check shows whether an item appears to be worn. It does not show whether the item is the right type for the task, whether it fits or whether it is fastened. Those checks stay with supervisors.
Set the rule, then place the cameras
Checks are most dependable where people pass or stay in a known position.
-
Write down where PPE is required
List each area and the items required there. Note the exceptions, such as marked walkways, offices and rest areas. The camera rules should match the written site rules.
-
Cover the entry points
At a door or gate into a PPE area, people usually pass a few at a time, upright and at a known distance. Point the camera towards people as they come in. This is usually the most dependable place to check hard hats, vests and masks.
-
Add fixed work areas
Where people stay at a station, a camera can be set close. This is where glove checks become more practical. Wide views of an open floor are usually the weakest.
-
Draw zones and set schedules
In each view, mark the zone where the rule applies and set the hours. A person on a walkway beside the zone should not raise a result.
-
Test each view on site
With the area made safe, ask staff to stand and move in each view with and without each item. Repeat in the lighting of each shift. Move the camera if the results are poor.
Alerts and trend reports
The same detections can be used in two ways. Decide which you need before setting thresholds.
- Real-time alerts
- A message is sent when an item appears to be missing. Alerts suit entry points and high-risk tasks, where a supervisor can act at once. Each false alert costs attention, so use alerts only on views that give dependable results.
- Trend reports
- Detections are counted by area, shift and item over days or weeks. The counts show where and when lapses cluster, which can point to causes such as layout, the supply of PPE or briefing. A few wrong results matter less here than in an alert. Compare each camera with its own past, not with another camera: each view has its own rate of error. Some systems produce these counts themselves. Others pass events to a separate reporting tool.
- Using both
- One workable arrangement is to alert at a few critical points and report on the rest. Starting with reports gives time to review each camera before its alerts are switched on.
Run it openly and review it regularly
Monitoring that staff do not understand, or that nobody checks, tends to lose its value.
Tell the workforce and respect privacy
Tell people about the monitoring before it starts. Explain:
- which areas and which items are monitored;
- what is recorded and who can see it;
- what follows an alert or a report;
- how to question a result that looks wrong.
Keep the purpose narrow: use the images for safety, keep them only as long as needed and limit who may view them. A PPE check needs to know whether an item is worn, not who is wearing it. Decide in advance whether results are linked to named people, and tell staff.
The rules that apply depend on your country and your agreements with staff. This guide is not legal advice.
Review samples to keep the results honest
On a regular schedule, compare a sample from each camera with the video:
- Results raised. Count how many were right, and note the cause of each wrong one.
- Quiet periods. Watch sample footage for missing items that were not flagged. The results alone cannot show these.
Group the errors by camera and by cause. Fix the picture first, then the zone, then the threshold. Share what you find with the workforce.
How Videolytical approaches this
Videolytical's PPE compliance module checks for hard hats, vests, gloves and masks. Zones, schedules and confidence thresholds are set for each camera, and alerts go to the video management software (VMS), by SMS, by email or to a webhook.
Models can be trained for site-specific objects. A rollout begins with a site survey and camera audit, and a pilot on a small set of cameras comes before scale-out with calibration.
See PPE checks on your own footage
Arrange a live demo on your own footage, send a sample clip, or ask about a pilot on a small set of cameras.